If you don’t want to tile to bumpy surfaces then you need a decent surface on the floor screed. But what exactly is a screed?
By definition, a screed is l “a layer or layers of screed material laid in situ, directly onto a base, bonded or unbonded, or onto an intermediate layer or insulating layer, to obtain one or more of the following purposes:
To obtain a defined level
To carry the final floor covering
To provide a wearing surface”
For tiling this is simply a floor covering designed to provide a hard-wearing, permanent and smooth surface.
Screeds come in a number of materials from traditional sand:cement, which can be fast-tracking (for example by using BAL Quickset Cement), calcium sulphate/gypsum screeds and Lime-based screeds, to smoothing and levelling compounds such as BAL Level Max.
Applied to a mature concrete base or slab (at least 6 weeks old), screeds can come in a number of forms including bonded, un-bonded, floating and heated – all of which can be modified. Alternatively apply a suitable smoothing and levelling compound. Modifying can improve the property of the screed for example reducing shrinkage or to improve strength. Less shrinkage reducing the chances of curling, and improved physical and mechanical strength can reduce the minimum thickness applied for certain applications.
Bonded screeds are typically mixed in a forced action mechanical mixer at different ratios of cement to sand with water, dependent upon the strength required. They can be modified with a product such as BAL Bond SBR, typically 5-10 litres of BAL BOND SBR for every 50 kg of cement mixed
Un-bonded (modified) screeds are typically applied over a damp proof membrane (dpm) laid over a concrete base. Minimum thickness should be 50mm at any point, designed to a thickness of 70mm. They must be cured initially as rapid drying may increase the risk of curling.
It is recommended to cover the screed with a polythene sheet in the first week initially before allowing to dry further in air. This is to avoid rapid drying out which may cause shrinkage cracks and also increases the risk of curling.
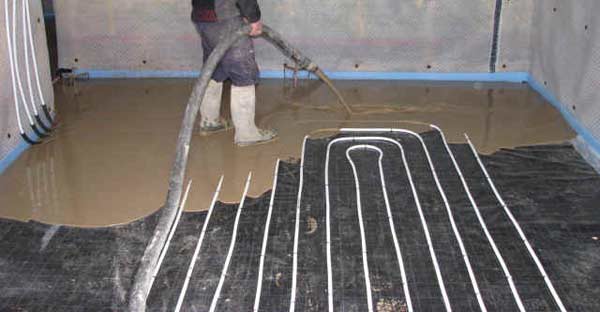
Floating screeds are usually applied over a thermal and acoustic layer on top of a base , for example insulation materials. When applying a floating screed it is essential to include a steel mesh to reduce the risk of cracking.
Heated screeds are applied over a wet or electric heating system on top of a thermal insulation layer over concrete. Reinforcement is achieved by steel mesh laid just above the heating system. Adding fibres in the screed mix can help to minimises early shrinkage cracking and improve flexural strength. It is important to remember that heated screeds need to be commissioned correctly before any tiling is commenced.
Levelling screeds, such as BAL Level Max, are laid to achieve SR1 surface regularity – that is under 2m straight edge with a gap no greater than 3mm. This is required for the application of ceramic tiles, using a suitable tile adhesive.
Fast track screeds, such as BAL Quickset Cement, are a good substitute for traditional Ordinary Portland Cement (OPC) and can be used for all types of cement:sand screeds.
When laying the screed ensure that it’s mixed to the right consistency i.e. for semi-dry consistency –squeeze the mix in a gloved hand to check that it retains its shape but does not crumble. Apply the screed using a float, or pumping machine to a battened area, and level using a screed bar drawn across the surface. Tamp down using a screed float and finish using a wooden float. Once laid, allow at least three weeks to cure when using traditional OPC, at least 4 hours (bonded screeds) or 48 hours (unbonded and floating screeds) when using BAL Quickset Cement – .Drying times can vary with thickness andambient conditions on site. For calcium sulfate screeds the drying time is approximately 1mm per day up tp 40mm in ideal drying conditions, but requires additional drying time for screeds above 40mm. Boards should also be used to protect the screed from traffic and contamination.
Before tiling a primer may be recommended for the prepared screed surface before application of the tile adhesive. Priming creates an effective barrier and assists in making the surface more stable.
When selecting your tile adhesive, consideration should be given to factors such as the tile type, and the type and method of cleaning of the floor whilst in service – i.e. how wet the finished floor may become and what are the risks associated with limited water penetration. Slow or rapid-setting tile adhesives can be used, dependent upon the tile type and environment.
When the adhesive is set, the joints between the tiles should be filled with a suitable grout – please note that a minimum of 3mm for floor tiling is recommended.
I hope this blog gives you a good initial guide to screeding and the techniques required.
If you are interested in finding out more about screeding and screeding techniques, why not sign up to our Screeding Masterclass. To find out more about our range of courses click here.


