Available in various shapes, sizes and textures, mosaic tiles come in beautiful designs that can create a stunning centre piece or flash of inspiration for a tiled project.
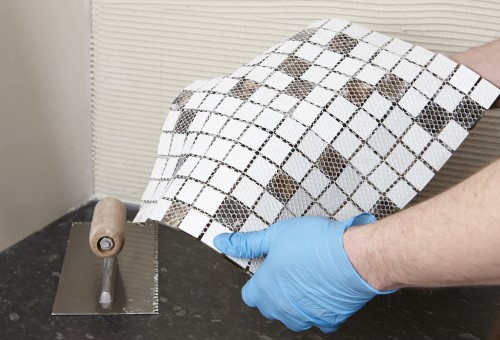
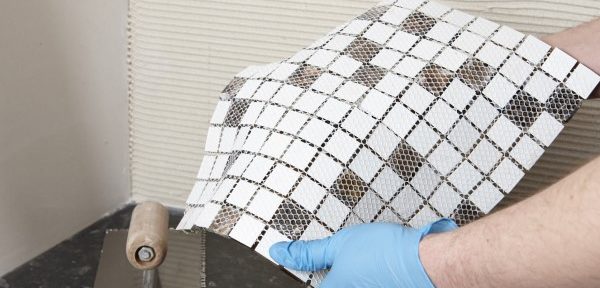
There are three different mosaic types – ceramic, glass and natural stone – and each can be formed into a sheet using mesh-backing, paper or plastic sheet face or glued tessera.
If you are tiling with a mesh-backed product, it is advisable to check the suitability of the mesh by immersing the product in water. If the glue breaks down or is visible over the majority of the mosaic, you may need to reconsider the product you are using. This is because British Standards state that the mesh should not exceed more than 25% of the surface area of the mosaic.
The key to a successful project using mosaic tiles is in the preparation, setting out and fixing. Preparation of the background to SR1 (surface regularity) is vital because final adjustment of tiles is very difficult. SR1 is a maximum of 3mm of deviation over a 2m straight edge.
If you need to build the walls out to achieve SR1, then it is advisable to use a render such as BAL Quickset Render. A pre-blended rapid setting polymer-modified cement:sand mortar, it is ideal for fast track installations and patch repairs as tiling can be carried out in just two hours.
With a working time of 30 minutes it can be used from 2mm up to a maximum of 20mm with normal rendering practices.
The most common background you’ll be tiling to is probably plaster. If it’s new, you should allow 4 weeks drying time, before brushing with a stiff bristle brush and priming with BAL Prime APD.
If the surface is plasterboard you can fix directly, and there is no need to prime when using flexible cement-based adhesives.
You can also tile with mosaics over existing tiles. Ensure that the surface is flat and true, check for soundness – if there are any hollow sounding tiles, these should be removed. Wash down the surface and fix directly such as BAL Max Flex Fibre.
Cement-boards and other tile backing boards – such as BAL Board – are also extremely good surfaces to tile to. Ensure that the boards are securely fixed with adhesive or at 300mm centres. Use appropriated tape over the joints.
Please be aware that British Standards now state that plywood and other wood-based sheets are not suitable as a wall tiling background. This is partly due to the poor quality of plywood on the market – and the proliferation of readily-available, cost-effective tile backerboards which are more dimensionally stable than ply.
When tiling with mosaics in a wet area, water sensitive backgrounds – such as plaster or plasterboard and some tile backer boards, will need to be waterproofed (or tanked).
This will conform with British Standards which state: “The use of impervious grouts and adhesives is no substitute for a tanked installation.”
BAL has several products which can be used for protecting backgrounds including BAL Tank-it – a two-part tanking kit that is dry and can be tiled in two hours. Ideal for shows and wet rooms, it is even suitable in total immersion areas such as swimming pools, spas and fountains.
As well as preparation, setting out is also crucial for a quality installation. What you don’t want is misaligned mosaic sheets! Fix your sheets using a minimum 3-4mm notched trowel, place the sheets in rows and beat into place using a grout float or hard rubber float. Always stagger the sheets (half bond) but maintaining joint alignment. Once applied, paper face sheets can be removed approximately 2 hours later.
When fixing with mosaics you can either use cement-based adhesives such as BAL Max Flex Fibre or BAL Rapid-Flex One, or more preferably opt for a ready-mixed adhesive such as BAL White Star Plus which is perfect for mosaic sheets.
BAL White Star Plus is brighter and whiter in colour – perfect for the application of translucent glass tiles and mosaics. A lighter, smoother formulation makes for easy cut out and application. Highly flexible, it is formulated with Fibre Strand Technology (FST) giving it extended open time of 30 minutes and more strength.
If you’re not keen on a ready-mixed product, you could always opt for a cement-based product like BAL Max-Flex Fibre. Slow setting in 16 hours, it allows more time to fix tiles and adjust them on the wall. Also, white and with a smooth mix, it makes for easy application for glass tiles and mosaics.
Before grouting any mosaic installation, it may be necessary to protect the tiles against grout staining with a protective sealer. This protects the tiles during the grouting process and can easily be cleaned off after grouting.
The best grout for use with mosaics is a product made with very fine sand such as BAL Micromax2. A fine grout is required, particularly with metallic or glass mosaics, so the surface isn’t scratched.
BAL Micromax2 is flexible, water and frost resistant and is formulated with Microban built-in anti-microbial and anti-mould technology. It is also efflorescence free – meaning no nasty salt stains.
If you want a truly waterproof and hygienic protection, then an epoxy grout like BAL Easypoxy AG is recommended. Extremely durable, BAL Easypoxy AG provides a smooth finish and is easy to clean. This product may also be used as an adhesive for certain background types and environments.
To finish your project, use a sealant such as BAL Micromax Sealant for all internal corners, perimeter joints and movement joints.
For technical advice and support with your mosaic project, call BAL Technical Advisory Service on 03330 030160.
(FIRST PUBLISHED IN TOMORROW’S TILE AND STONE)


